Hardwire Ring Video Doorbell
- Posted on 25 October 2020
- Posted in DIY Projects
I wrote this guide because every other article out there either asks you to charge the Ring Video Doorbell and mount it OR use an indoor power adapter. This article mentions the components and settings required to hardwire the doorbell and use it with a doorbell transformer and Ring Chime. This way your Ring video doorbell gets trickle charged and you do not need to bother with charging the batteries often or buying additional battery for uninterrupted usage.
This article is specific to Ring Video Doorbell 2 and Ring Video Doorbell 3 ONLY and if your doorbell transformer is integrated in your existing doorbell. This article shows the work I had done myself and is for reference only - I accept no liability for injury, loss or damage due to this article. Connecting the Ring Video Doorbell to an AC transformer requires some knowledge of wiring and soldering. Please consult an electrician for assistance.
Hardwired vs. Battery Powered Operation
The rechargeable battery that comes included with your Ring Video Doorbell can power your device without being connected to an external power source. However, it will need to be recharged on a regular basis. On the other hand, a hardwired Ring Video Doorbell uses the trickle charge it gets solely to charge the battery.
So even though its hardwired, the Ring Video Doorbell still requires that a battery be inserted. This is because it does not actually use the wired power to run its operations but instead relies on the battery for that. Personally, I think this is better as the Ring Video Doorbell 2 or 3 will be able to function off the battery power in the event of a power failure unlike the Ring Video Doorbell Pro.
Components
-
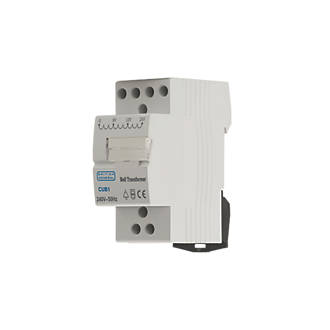
British General 8-24V 8VA Bell Transformer Module - £8.95 from Screwfix.
-
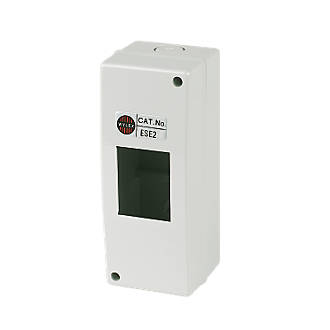
WYLEX ESE2 IP40 2-Module Unpopulated DIN Enclosure - £3.55 from Screwfix.
-
Axiom Metal Clad Blank Plate 1 Gang + Back Box - £2.52 from ToolStation.

-
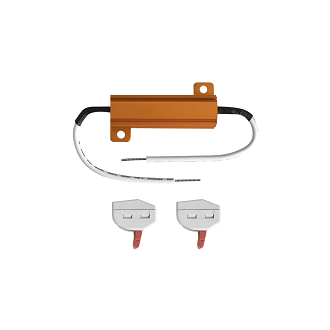
25 Ohm 50 Watt Wirewound Resistor for Video Doorbells - £8.00 from Ring UK.
-
Nexans 2 core Bell cable - £5.00 from B&Q. (only required if you plan to relocate bell switch)

-
Wiring circuit diagram for the Ring Video Doorbell using 24VAC adapter and Wirewound Resistor

Points to Note:
- 8-24 VAC Bell transformer alone is supported. DC is not supported; nor is any other type of transformer recommended.
- 25 Ohm 50 Watt Wirewound Resistor is required. Wires should be soldered onto the resistor.
- Diode provided is NOT required as I was not using existing doorbell chime but had paired it with a Ring Chime.
- Most doorbells in Europe are designed to work with 12VAC transformers which is not enough power to support Ring Video Doorbell. I replaced my original Deta mechanical doorbell with the Bell transformer and set the output to 24VAC. Ring Support had advised power sent to doorbell must be between 16 Volts and 24 Volts.
- One of the fastening hole on the resistor was widened and threaded so that it could be fastened on to the inside of the backbox. The idea bieng that the backbox could then act like a huge heat sink to dissipate the heat generated in the resistor.
- I have intentionally kept a small gap between the backbox and the DIN enclosure so that in the event the resistor heated up the backbox the distance would prevent the hot backbox from melting the DIN enclosure.
Conclusion
And this is how the final set up looks like:
