Terraform - Hello World
- Posted on 30 September 2020
- Posted in Technical Notes
This article is a beginner’s guide to help you configure Terraform on your Windows PC and then get you on your way to building a simple resource group in your Azure subscription.
Terraform is an open-source infrastructure as code software tool created by HashiCorp. Users define and provision data centre infrastructure using a declarative configuration language known as HashiCorp Configuration Language, or optionally JSON.
Terraform is a single binary file (main.tf) that reads configuration files, creates a state (terraform.tfstate) and then ensures your infrastructure is creating and remains in that state.
Contents
This article is split up into 3 main sections:
Alternatively, since Azure Cloud Shell has Terraform pre-installed, you can ignore the prerequisites and jump straight to building terraform templates using Azure Cloud Shell and Terraform
Prerequisites
1. Install PowerShell
Personally would suggest that you use this opportunity (if you have not already) to install or upgrade PowerShell 7.
Refer to instructions in my previous post.
2. Install Azure CLI
Follow the instructions here to install Azure CLI.
3. Install Terraform
a. Download Terraform from the Terraform download page
b. Copy it to a folder in a location on your PC. Example: D:\Tools\Terraform
c. Add this folder location to your Environment variables via PowerShell Command line by executing the command $env:Path += ";D:\Tools\Terraform"
d. Open a new PowerShell terminal and enter the command terraform.
If description and help is returned then you have successfully registered Terraform on your PC.
4. Authenticate to Azure
From the PowerShell terminal window, type the command az login and login to your Azure subscription
5. Make a note of your Azure Subscription ID where resources are to be built
From the PowerShell terminal window, type the command az account list --query [*].[name,id].
Copy the relevant subscription ID (example: 'xxxx-xxxxx-xxxxx') to a notepad for use later.
6. Create a Service Principal using the Contributor role scoped to the subscription mentioned above
From the PowerShell terminal window, type the commands
$subscriptionId = 'xxxx-xxxxx-xxxxx'
.
$servicePrincipal = az ad sp create-for-rbac --role="Contributor" --scopes="/subscriptions/$subscriptionId" -n TerraformHelloWorld | ConvertFrom-Json
.
7. Set Environment Variables so that Terraform needs to know four different configuration items to successfully connect to Azure.
From the PowerShell terminal window, type the commands
$env:ARM_SUBSCRIPTION_ID = $subscriptionId
.
$env:ARM_CLIENT_ID = $servicePrincipal.appId
.
$env:ARM_CLIENT_SECRET = $servicePrincipal.password
.
$env:ARM_TENANT_ID = $servicePrincipal.tenant
.
Note:
- Terraform needs to know 4 configuration items (Azure subscription ID, Service Principal’s Azure AD application ID, Service Principal password, Azure AD tenant) to successfully connect to Azure. We can pass these as optional parameters in the Terraform template but that is bad security practice as this gets stored in the repo. The alternatives are to use environment variables OR if integrating with a CI/CD pipeline (Azure DevOps), then place placeholder variables which get replaced by value retrieved from Azure KeyVault during the build.
- When you upgrade Terraform on your machine to latest version, your existing Terraform configurations might need syntax updates.
- NEVER check-in your .tfstate file into a source code repository as this is the one place where secrets in the configuration files will end up in plain text. And Strictly control who can access the location where the state file is located
Build
Now that Prerequisites are in place. We will build a resource group in Azure using Terraform to prove that our setup is working.
1. Navigate to the folder where you have or want to access your Terraform templates from:
mkdir TerraformCode
cd TerraformCode
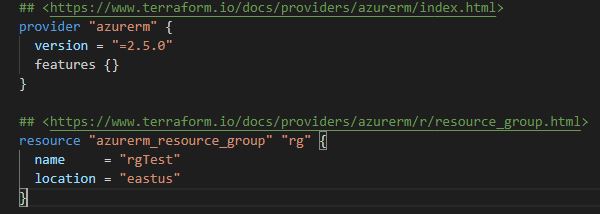
2. Create a Configuration File
Main.tf is the configuration file which contains provider and resource declarations for all the infrastructure
the configuration will manage with Terraform.
3. Initialize Terraform
The terraform init command is used to initialize a working directory containing Terraform configuration files.
This is the first command that should be run after writing a new Terraform configuration or cloning an existing one from version control.
It is safe to run this command multiple times.
terraform init
4. Validate the Configuration
The terraform plan command is used to create an execution plan.
This command is a convenient way to check whether the execution plan for a set of changes matches your expectations without making any changes to
real resources or to the state.
terraform plan
5. Build resources
Build the resources by running terraform apply. When you execute the command, Terraform reads the configuration files you have in the directory
and prompts you for confirmation. Once you type “yes”, it will then reach out to Azure and begin building the associated resources.
terraform apply
A few minutes after you see the successful execution of the terraform apply command deonted by the Apply complete! then you can check the Azure Portal
to confirm that the resources you defined have been provisioned.
Clean Up
If this was your test environment, you will want to destroy the resources built to save on costs and delete that service principal if not required any more.
-
If you’d like to validate the configuration and test what would happen if you were to run terraform destroy,
you can also run the command
terraform plan -destroy
and then run the commandterraform destroy. -
Delete the Service Principal created in Prerequisites above (replace “TerraformHelloWorld” with your Service Principal name)

Conclusion
Terraform is a great and free tool to build infrastructure across Cloud Providers. This article is only to help you get started and on your way. Find more detailed information on Terraform Commands at terraform.io.